Compress audio files with Audacity
The aim of this guide is to show you how you can record sermons to Audacity and prepare them ready for upload to your church website.
Before we can begin to prepare the audio, we need to record it and there are several ways to do this and you will need to choose the best method for your church. This guide will not go into great detail on this but will give a brief overview of the options available.
The easiest method is to place an MP3 recorder on the lectern in front of where the speaker will stand, this requires very little setup and is fairly cheap but usually quality is fairly poor and if the speaker moves or turns away from the recorder, the volume level will drop off. If you must use an MP3 recorder then it is better to buy an external lavalier microphone to clip to the speakers clothing or a headset microphone. The different types of microphone are covered later.
Through a mixer (sound desk) into Audacity or some other digital recorder, if your church already has a mixer to provide sound reinforcement, then this is certainly your best option. If it is possible to place a laptop or desktop near the mixer, then it makes sense to record directly into Audacity as that is what we are going to be working in later. One word of warning, a recording of a service can take between 1.5 → 3GB of space so make sure there is sufficient space to record the entire service.
Microphone Types
Not all microphones are created equally, a cheap microphone bought off the Internet for £20 will not perform the same as one from a reputable manufacturer such as Shure or Sennheiser, costing £200+, get the best you can afford. Choose one that is designed for speech, microphones are designed for different purposes such as vocals, instruments, drums, or speech and the wrong one may not sound or perform well.
Vocal microphones are for singing not talking, some will do both well but not all, vocal microphones are typically less sensitive than speech microphones so they do not pick up sounds of other singers or instruments as a result they need to be positioned very close to the singer's mouth.
Stand Microphones
As it sounds this is a microphone designed to be placed on a stand, these have a few advantages, they are easy to setup, if you have a lot of people involved in the service using one microphone keeps things easy. They do suffer from the issue of needing the speaker to remain close to the microphone, preferably facing it.
Lectern Microphones
This is a step up from the stand microphone and is made to be fitted on top of a lectern, they often have a flexible neck to allow adjustment, it is advisable that a shock mount be fitted also to prevent noises from people placing things on the lectern.
Lavalier Microphones
These are the microphones that attach to a person's clothing such as the lapel of a jacket, these are the most popular choice at the moment for churches as it keeps the microphone close to the speaker. They can be tricky to setup but once setup correctly, sound quality can be very good. Whilst not essential these are often teamed up with a wireless body pack allowing the speaker to move freely.
Headset Microphones
These have become popular over recent years as it keeps the microphone close to the sound source, like lavalier microphones, these can be used with a wireless body pack to allow freedom of movement, the disadvantage being that they do sit right to the side of the speaker's mouth and are therefore quite visible which puts many people off. These do tend to be at the premium end for something small and good quality.
Recording Tips
Record the entire service – yes, even if you only intend to keep the sermon. It is possible to delete what you don't want, it is impossible to recover what you don't record. So many times someone has simply forgotten to start the recording and has either missed the beginning or missed the entire talk. At least if you miss the beginning of the service you should hopefully still get the entire talk.
Record high quality – similar reasons, even though we are going to reduce the quality later, it is better to work with high quality source files, then downgrade them. This also allows you to keep high quality versions should you so desire for other uses such as making CDs.
Getting Started in Audacity
The first thing we need to do is to download Audacity, as with downloading any piece of software, we recommend downloading from official sources only. For Audacity this is https://www.audacityteam.org/download/. Download and install the latest version for your operating system.
Recording in Audacity
Before starting make sure that the correct microphone is selected (1), the name for this will vary between machines, just make sure that if you are using a laptop, that you haven't selected the internal microphone.
The level of the recording can be adjusted using the control marked '2', try to keep most of the speech around the middle, if it goes over the top or bottom “clipping” will occur and some of the sound will be lost. Too low and you won't be able to hear the recording. Remember, if you are only using the sermon, you need not worry about the level of the music.
To start recording press the record button.
When you finish remember to save the file.
Editing Our Recording
Whilst we are dealing with sound, we are primarily using a screen do the editing so knowing what things look like will be quite helpful here. At the moment we are just going to concentrate on the difference between speech and music, this will help you find your way around the file much quicker than by ear.


Notice that there is constant sound here, now compare this to how speech looks:


See how we regularly have a flat line in the middle, that is silence between words. With experience you will start to be able to see other sounds in the bars like someone knocking a microphone or coughing.
Trimming Our Recording
Now scan through the file till you find the beginning of the sermon, in our church, the sermon usually starts around 30 minutes in so that is a good place to start looking. Click on a piece of silence just before the beginning of the sermon, you should get a vertical line there where you have clicked.


Now at the bottom of the screen set the Selection Start to 00h 00m 00.000s


This will highlight everything up to the point we selected:
To remove all of this, just press the “delete” key. Now we need to repeat the process for the end of the talk. Select the end of the sermon and then under “End” at the bottom change 00h to 02h, this will highlight to the end of the service, now just press delete. Now we should just have the sermon remaining and the part that takes the most of your time is done.


Stereo to Mono
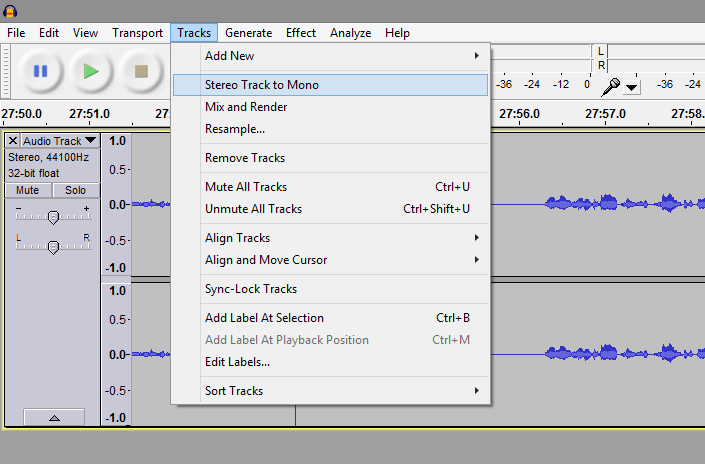
When listening to music, it is great having stereo, it sounds so much better but just for a sermon, there really isn't any point having stereo as both channels are most likely identical anyway. So we can save some space by mixing down to mono. Go to the “Tracks” menu at the top of the screen and select “Stereo Track to Mono”. This may take a few minutes depending on your computer.


Noise Removal
If you listen carefully to the sound, you will probably notice a slight hissing, particularly during the silence, the level of this hissing will vary due to a number of factors but regardless of that we are going to remove it as it isn't pleasant to hear and it will make your file a little bigger.
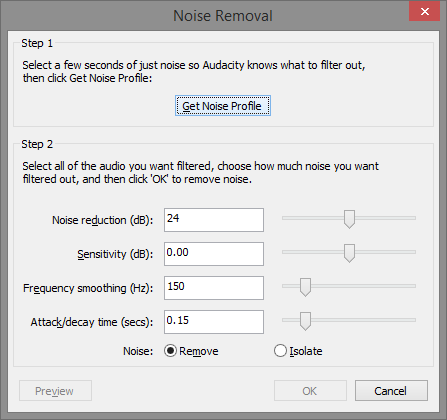
The first thing to do is to find a few seconds of silence so we can give Audacity a sample of the noise we want to remove. So have a quick look through the sermon to see if you can find 2-3 seconds where there is no talking, then highlight that.
Now you have the selection, go to the “Effects” menu and select “Noise Removal”. You will notice that the “OK” button is disabled, don't worry about that, this is a two step process, for now click “Get Noise Profile”, the window will disappear. Reopen it and this time you can press “OK”.


Resampling
Whilst most of the other steps could really be done in any order, I always leave this until last so I am working on the best quality source that I have, this step is to deliberately degrade the sound quality by getting rid of some of the information, again for music you really have to keep the best quality you can so that you can hear the subtle nuances of the music. We really do not need that in a sermon audio so we can be a little more drastic and get rid of some of the information. I am going to use settings that I have found give a good balance between quality and size, feel free to experiment but be warned that if you get rid of too much it will sound like the preacher is a robot and will not be pleasant to listen to.
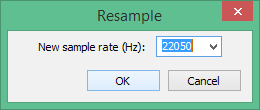
In order to do this, we will reduce the frequency from 44,100 Hz to 22,050 Hz. This is a two stage process, the first stage being to change the projects frequency in the bottom left corner of the screen. Simply select 22,050 from the drop down.


Next go to Tracks → Resample... in the top menu, the window should now say 22,050, just click “OK” here. This process can take a little while depending on your computer.


Export
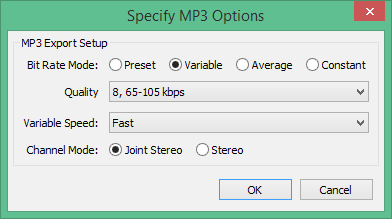
One more step now, to export our sound to an MP3 file. So in the top menu go to File → Export set the file type to be MP3, remember it must be MP3 format for uploading to Church Edit. Click “Options” and you should see the following options:


Set the Bit Rate Mode to variable and Quality to V8, if you need to get size down further you could select V9 but in most cases V8 is fine. The other boxes you can leave. Then click “OK” and in the file save dialogue give your file a name and save it, one more window will pop up asking for metadata. Just click “OK” on this as Audacity doesn't do this very well and you would be better using a special piece of software such as MP3tag to do this for you. The export may take a couple of minutes after which you should have a file ready for upload.
Disclaimer: Audacity is 3rd party software and has no connection with ChurchEdit, as such, we are not able to offer support for this software. If you have problems installing or using Audacity, they provide help files which you can find here.